Baffle installation description |
N505 |
N9424Z |
N6299U |
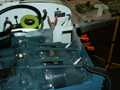
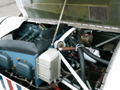
N505: He complained of high CHTs. Gee. I wonder why.
N9242Z: These are the original baffles on a plane that is 30 years old.
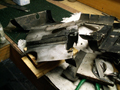
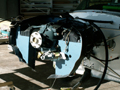
6299U: This is what I had to start with. |
 |
 |
 |
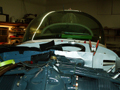
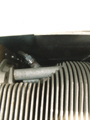
N505: More pictures.
N9242Z: These are the original baffles on a plane that is 30 years old.
N6299U: Nice baffles, huh. |
 |
 |
 |
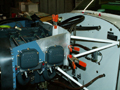
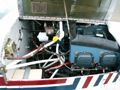
I had to make all new cylinder baffles. The original ones were bent and cracked beyond repair. All baffle parts were powder coated prior to assembly.
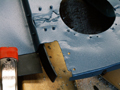
= = > Notice the misfit between the baffles. The #4 cylinder baffle on ALL AA5x series are the same ones used on the AA5 Traveler with an O320. Go figure. |
 |
 |
|
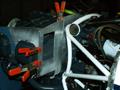
As odd as it seems, the factory drawings show the same misfit. That's just lazy engineering. The misfit is gone in this photo. I trim the baffles to be perfectly in-line. Not only that, but the rear of the baffle on a Tiger is about 1/2 inch too short. It's 3/4 inches too short on a Cheetah. The #4 cylinder baffle is the correct height. |
 |
 |
|
Here is the right side; finished and ready to fit the baffle seals.
On 9242Z, I trimmed the right baffles down some also. Over the years, I've noticed that the baffles on the right side chafe against the upper cowling. They are about 3/8 inches too tall toward the front.
. . . . . Look at any Tiger and you will see the right baffle seal has been crushed between the upper cowling and #1 metal cylinder baffle.
. . . . . Whoever was responsible for approving the baffle installation, during the original design process, either didn't know what he was doing or he was just plain lazy. |
 |

 |
|
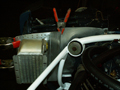
Notice the pop-rivet. This keeps the baffles aligned. |
 |
 |
|
N505: Then I spread the baffles (notice the spacing between them) and put a piece of 3/4 inch masking tape adjacent to the top edge of the baffles.
N9242Z: The trick is to spread the baffles so the top of the metal baffles are aligned. I use a straight edge. The baffle seal is pre-punched for 5 evenly spade rivets per metal baffle. The center two (one on each metal baffle) are about 1 1/4 inches apart. |
 |
 |
|
N505: I used to cement the baffle seal to the baffle with RTV 732 and let it set 24 hours. That really isn't necessary. Just rivet the seal down correctly using wide area rivets.
N9242Z: Another shot of the baffles with respect to the straight edge. |
 |
 |
|
N505: I notch the seal where the baffles bend. Notice how the baffle seal has a natural bend to it. This relieves a great deal of the chaffing against the upper cowling and yet provides an excellet seal to the upper cowling.
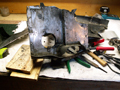
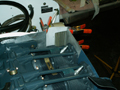
N9424Z: The steel oil cooler brace was badly corroded. Here is before and after bead blasting the corrosion off. The brace was then powder coated. |
 |
 |
|
N505: Another view of the left side seal. The seal has a natural bend to it using this approach. When you close the cowling, you know it'll be in place. The seal is riveted on with broad head pop-rivets during final assembly.
N9242Z:
A shot of the right side baffle.
|
 |
 |
|
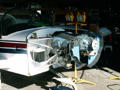
N505: The front baffle. What you don't see are the many, many hours spent prepping all of these parts for powder coating.
N9242Z: Another fucked-up baffle design is the forwad right front baffle. It always chafes on the nosebowl. I removed about 9/16 of an inch from this corner. |
 |
 |
|
N505: I replaced the seal around the cabin heat inlet. This is the back side. The baffle seal on either side of the muffler opening protects the baffle from chafing on the muffler.
N9242Z: Repaired right forward baffle. Two pics.
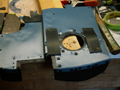
N6299U: The Cheetah is a different animal.
On paper, the baffle arrangement looks good. In practice, it is a mutha to get it to correctly fit together. |
 |

 |
 |
Another shot of the front baffles on two Tigers and a Cheetah.
I had to replace the entire right (as you're looking at it) side of the front baffle on N505.
It had been worn through a number of times and patched. |
 |
 |
 |
With the baffle seal installed, prior to to cutting the slits in it for fitting against the nose bowl. Use broad head pop-rivets. Rivet the seal side when possible and you won't have to fuck with little washers to hold the seal in place. |
 |
 |
 |
N505: The center section. I overlap a good 2 inches in the corners.
N9242Z: One common location for cracking is where the baffle stand-off ataches. This one got a reinforcement. ALWAYS use the large area washers on the bolts. |
 |
 |
 |
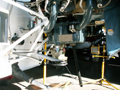
N505: Right side showing the initial installation.
N9242Z: Another common area for cracks, but only on pre-'77 AA5B's, is the forward attach on the right baffle. I believe this is due, in large part, to the lower cowling being formed wrong on these planes.
N6299U: This area chafes on the muffler. Protect it with baffle seal.
See next step . . . |
 |
 |
 |
N505: Nose bowl. I trial fit the completely assembled front baffle to see how it'll all fit together.
N9242Z: The lower right baffle hits the lower right side of the nose bowl. It needs to be 9/16 inches shorter in this area. |
 |
 |
 |
N505: If you look closely, you can see the seal as it goes behind the landing light. The seal must be shortened in this area or it'll bunch up when installed.
N9242Z: Kind of out-of-place, but, this is the right side. |
 |
 |
 |
N505: Another shot of this area.
N9242Z: This is how I find the center of the baffles across the back. The string stretches from the firewall mount to the center of the forward cowling attachment. I then cut a slot for the upper cowl hinge. |
 |
 |
 |
N505: This is the toughest part to get a good seal. The original designers of the baffle system should have spent more time laying out the shape here to simplify the sealing. A lot of leaks can occur here. Lots of corners to seal.
N9242Z: Sealing against the center hinge (left side). |
 |
 |
 |
N505: Another closeup of the other side.
N9242Z: Sealing against the center hinge (right side).
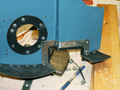
N6299U: Oil cooler baffle for Stewart Warner 8406 oil cooler. |
 |
 |
 |
N505: Here is the baffle that goes around the bottom of the cylinders. I put a pop-rivet where the safety wire will go and drive out the pop-rivet mandrel. This leaves a very strong hole which will not tear through like the original hole and fine wire sping did.
N9242Z: Sealing against the center hinge. |
 |
 |
 |
N505: Another shot of the reinforced holes.
N9242Z: There is a trick to getting the (stupid) corner to seal. Fold over the seal and rivet it to the baffle. This also works on the corner where the oil cooler is. |
 |
 |
 |
N505: This center baffle is on both sides. Notice where it has worn through. I use RTV 732 wherever I've noticed any wear. let it set for 24 hrs before handing the part. I reinforce these holes with rivets also.
N9242Z: This is what all the seals looked like when I started. Left Front.
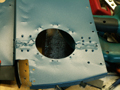
N6299U: Showing the oil cooler opening in the left rear baffle. |
 |
|
 |
N505: The #4 cylinder baffle is tighter around the cylinder barrel than the others. It's possible the opening is too small. A possible area for research. 99% of the time the SCAT tubing from the front baffle partially blocks the cooling air outlet from #4.
N9242Z: Some dumb ass made baffles out of 20 gauge galvanized steel. He also left 1/8 to 1/4 inch gaps between the cylinder baffles. I reduced CHTs by 70 degrees! |
 |
 |
|
N505: This is the # 3 cylinder. The safety wire is kinked to tighten it and to provide some spring constant where practical.
N9242Z: Here is a shot of #3 cylinder baffle showing how it's safety wired together. |
 |
 |
|
N505: Another shot of #4 where the air exits from the cylinder head.
N9242Z: Here is a shot of #4 cylinder baffle showing how it's safety wired together. |
 |
 |
|
N505: Here is #2 cylinder looking up.
|
 |
|
|
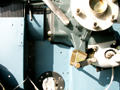
N505: Seal on the left rear baffle to the engine. The area behind the case bolt is usually open. There is a lot of custom fitting here since the factory never sealed this very well.
N9242Z: An extra picture of the seal behind the oil pressure relief valve. |
 |
 |
|
N505 & N9242Z: Here is the right side. Again, the factory never paid any attention to the big gaping hole in this corner. Two different seals were used to fill this area. it's difficult to see in this picture.
N6299U: Fitting the front baffles |
 |
 |
 |
Another view of the left rear seal. This was prior to notching for the cowling. that part was left until everything was assembled so that the notch would be in the right spot.
6299U: A view through the left inlet. Perfect seal. |
 |
 |
 |
N505: Left side. Finished. Nice fitting seals without bending the hell out of the baffles.
N9242Z: Left hand baffles (2 pics). Again, and I cannot stress this enough, "THERE IS NO REASON TO BEND THE HELL OUT OF THE METAL BAFFLES IN ORDER TO MAKE THE SEAL FIT AGAINST THE UPPER COWLING." Every time I readon teh Grumman Gang about someone "FIXING" their baffles by bending the top edge over, . . . all I can think of is, "If they knew what they were doing they could make them lay down.".
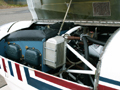
N6299U: A finished baffle and 8406 oil cooler installation. |
 |

 |
 |
N505: Another shot of the seal at the rear of the engine.
N9242Z: Same location on this plane.
N6299U: A close-up of the same area as above. |
 |
 |
 |
N505 & N9242Z: Right side sealing. The corner (under the hinge) is difficult to get right. I overlap from both directions. The seal from the left side of the engine tucks under the seal from the right side. They both fit snugly together with the cowling closed.
N6299U: A view through the right inlet |
 |
 |
 |
N505: Right side cylinder baffle seal natural curvature. The baffle seals are finished.
N9242Z: You'll notice the baffle seal appears contoured to the curvature of the cowling. It is not necessary to bend the hell out of the metal baffles in order to get the seals to fit snug against the upper cowling.
N6299U: This is another view of finished baffle seals. |
 |

 |
 |
Citabria N8571V: I made this splitter between the #4 cylinder and the oil cooler. This combination with a Stewart-Warner 8406R oil cooler dropped the oil temp 20 degrees F.
N9242Z: The people who install these clamp bolts with the nut on the inside have no business working on planes. They need to find competent mechanics. If this doesn't make sense to you, find a good mechanic. |
 |
 |
 |